You’re not alone. Most new bloggers look at Pinterest and feel overwhelmed.
All those boards, pins, and keywords seem confusing.
Without Pinterest, your blog posts sit unnoticed.
Other bloggers get thousands of visitors from Pinterest while you struggle to get even a few clicks.
You watch your traffic stay flat while theirs grows every month.
Pinterest is actually simple once you know the basics.
This guide shows you exactly how to set up your account, create boards, and write descriptions that get found.
Follow these 8 steps and you’ll start getting real traffic to your blog.
Save/Pin the image below👇because I often update my posts. So stay informed with this blog “How to Use Pinterest for Beginners” and save it.
This page have some affiliate links. In other words, if you buy from my links, I may get a commission. Some images were sourced from Deposit Photos
Ready to Learn How to Start a Thriving Pinterest Blog? Click Here Now
1. Create a business Pinterest account
Getting started on Pinterest is easy.
You can set up a free business account in just a few minutes.
A business account gives you access to helpful tools like analytics to see how your pins perform.
You can also run ads if you want to reach more people.
There are two ways to get a business account:
Create a new account from scratch, or convert your personal account to a business one.
Go to Pinterest’s website and click “Create account.”
Choose the business option when prompted.
Fill in your business name, email, and password.
And pick a username that matches your brand or business name.
Add your business details like your website and location to help people find you more easily.
Upload a clear profile picture that shows your brand.
Write a short bio that explains what your business does.
Keep it simple and use keywords that describe your interests or business.
For example, if you share cooking content, mention “easy recipes” or “home cooking” in your bio.
This helps people find you when they search for those topics.
2. Claim your Website on Pinterest
Claiming your website on Pinterest connects your site to your business account and unlocks analytics so you can see how your pins perform.
You need to own your website’s domain to claim it and have access to edit your website’s code or use a website builder.
Pinterest offers several ways to verify your site.
The HTML tag method works for most websites—just copy a special code and add it to your website’s header section.
If you use WordPress, you can add the code through your theme editor.
Wix and Squarespace users can paste it in their site settings.
The meta tag method is another option.
You get a verification file to upload to your website’s root folder.
Once you add the code, go back to Pinterest and click verify.
Pinterest checks if the code is there correctly.
After verification, you’ll see a checkmark next to your website URL.
This shows other users that you own the site.
Claimed websites get better analytics data.
You can track which pins drive the most traffic to your site.
And when you claim your website, you’ll have rich pins available.
Rich Pins pull information straight from my website to my pins.
I use them because they add extra details that make people want to click on my pins more.
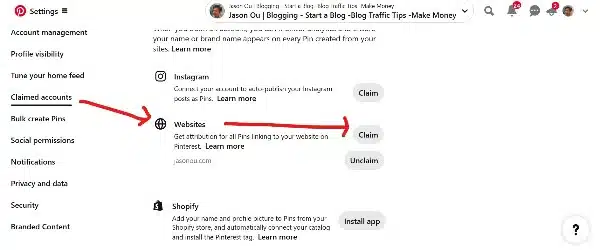
Still unsure about claiming a website on Pinterest? Then read my full guide on How to Claim your Website on Pinterest in 5 Steps.
Figure 1: How to claim your website on Pinterest.
3. Find the right Pinterest keywords
Keywords are the secret to getting found on Pinterest.
When people search for ideas, they type words into the search bar.
You want your pins to show up in those searches.
Start with Pinterest’s search bar.
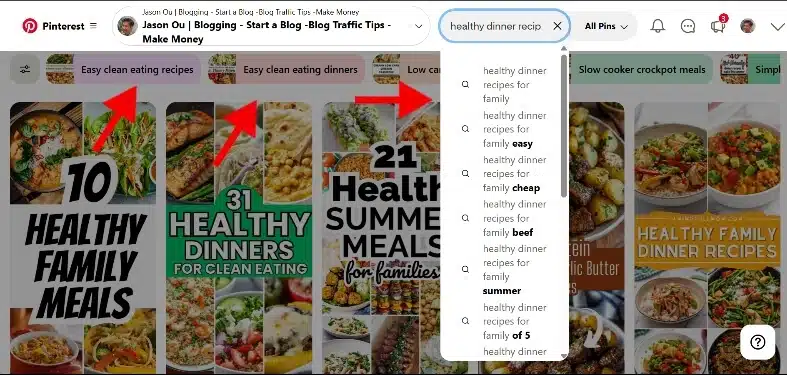
Type a word that relates to your content and watch what appears in the dropdown menu.
These suggestions are real searches people make on Pinterest.
Write down all the keyword ideas you see.
Look for phrases that match what your audience wants.
If you blog about healthy dinner recipes, you might find “healthy dinner recipes for family” or “healthy dinner recipes for two.”
As Well, check out Pinterest Trends to see what’s popular right now.
This free tool shows you which keywords are getting more searches and gives you related keyword ideas.
Look at successful pins in your topic area.
Read their titles and descriptions to see what keywords they use.
This can spark new ideas for your own keyword list.
One last point.
You can try different keyword combinations.
Instead of just “recipes,” use “30-minute recipes” or “budget-friendly meals.” Longer phrases often work better because they’re more specific.
Make a list of 10-20 keywords that fit your content.
👋A Quick Note: You’ll use these keywords in your pin titles, pin descriptions, board descriptions and board names to help people find your pins.
Figure 2: How to use Pinterest to find your ideal keywords.
4. Create boards to organize your pins
Boards are like folders that help you sort your pins by topic.
Think of them as digital collections where you save ideas that interest you.
You can create boards from your profile page or while saving a pin.
Start with topics you care about most.
Popular board ideas include recipes, home decor, fashion, travel, and DIY projects.
Pick names that clearly describe what you’ll save there.
Keep your board titles simple, keyword optimized and easy to understand.
Other users should know what to expect when they click on your board.
You can make boards public or keep them secret.
Secret boards are great for planning surprises or personal projects.
Consider creating specific boards instead of general ones.
“Quick Weeknight Dinners” works better than just “Food” because it’s more focused.
Pinterest also offers sections within boards.
These let you divide one board into smaller groups for better organization.
👋A quick reminder: Make sure your board titles and descriptions are keyword optimized.
5. Upload your own pins to share original content
Creating your own pins lets you share original content with Pinterest users.
You can use free tools like Canva to help you design a vertical pin that contains a high quality image and a text overlay or headline for your pin.
The text itself should contain the most important message.
You can then upload these pins or videos from your computer, tablet, or phone.
Start by clicking the “+” button on your Pinterest homepage.
Select “Create Pin” from the menu options.
Choose the pin or video you want to upload from your device.
Pinterest accepts most common file types for both photos and videos.
Remember to add a compelling title and keyword that describes your content.
Write a detailed description using keywords people might search for.
Pick the right board to save your pin.
You can also create a new board if none of your existing ones fit.
Make sure your images are high quality and vertical if possible.
Pinterest favors tall images that take up more space in feeds.
Add your website link if you want people to visit your site.
This helps drive traffic back to your content.
Upload pins regularly to stay active on the platform.
Fresh content helps you show up in more searches and recommendations.
🎨 Need Help With Pinterest Graphics? Use Templates!
Making good-looking pins takes time.
Not all of us have hours to sit in Canva creating designs from scratch.
And coming up with new ideas for pins every week?
That gets tiring too.
💡 Here’s a Shortcut That Saves Hours:
Use Pinterest templates!
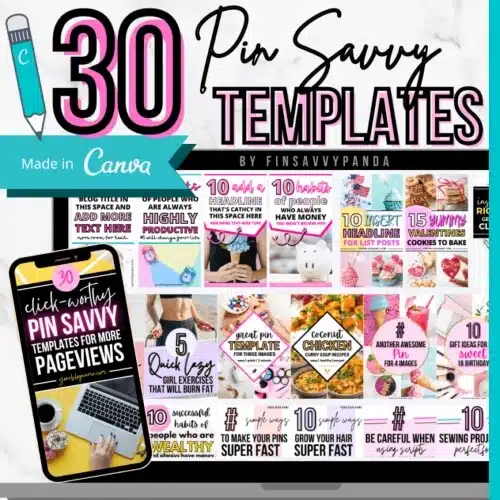
I use this Viral Pinterest Template bundle for Canva, which has saved me hours of headaches.
It’s perfect for busy bloggers who want to:
- Save time on design
- Create click-worthy pins faster
- Stay consistent without burnout
✅ Why These Templates Work:
- Made for bloggers by a blogger
- Fully customizable in free Canva
- Designs that actually get clicks
- Batch create pins in minutes, not hours
You just drag, drop, tweak the text ... and boom! Done.
👉 Grab your viral Pinterest templates here and start creating pins the easy way!
6. Write clear and catchy pin descriptions
Your pin description tells people what your pin is about.
It helps them decide if they want to click on it.
Write descriptions that are easy to read.
Use simple words that your audience understands. Keep your sentences short and clear.
Add keywords that people search for.
Think about what words someone would type to find your content. Use these words naturally in your description.
Make your description longer than just a few words.
Pinterest likes descriptions with more details. Aim for at least one full sentence that explains your pin.
Start with the most important information first.
Tell people what they will get if they click your pin. Be specific about what you are sharing.
Use a call-to-action at the end.
Tell people what to do next, like “click to read more” or “save this for later.”
Write like you are talking to a friend.
Keep your tone casual and friendly. This makes people want to connect with your content.
Test different descriptions to see what works best.
Pay attention to which pins get more clicks and saves.
7. Pin regularly to keep your boards fresh and engaging
Pinterest works best when you stay active.
You should pin new content several times each week to keep your boards looking fresh.
Aim to pin 3-5 times per day if possible.
This helps more people see your content. You can space out your pins throughout the day instead of posting them all at once.
Mix up your content types.
Pin your own photos along with content from other users. This variety keeps your boards interesting for followers.
Create a simple schedule that works for you.
Maybe you pin in the morning with coffee or during lunch breaks. Pick times when you can be consistent.
Don’t forget about your older boards.
Add new pins to boards you made months ago. This brings them back to life and helps new people find them.
You can use Pinterest’s scheduling tools to plan pins ahead of time.
This helps you stay active even when you’re busy with other things.
8. Use keywords to improve pin searchability
Pinterest works like a search engine.
People type words to find content they want. You need to use the right keywords so your pins show up in searches.
Start by thinking about what words your audience would type.
If you share cookie recipes, they might search for “easy chocolate chip cookies” or “homemade desserts.”
Use Pinterest’s search bar to find popular keywords.
Type in a word and see what suggestions pop up. These are real searches people are doing.
Then …
- Put keywords in your pin titles and descriptions: Write naturally and don’t stuff too many keywords in one place. Pinterest can tell when you’re trying too hard.
- Add keywords to your board names and descriptions too: This helps Pinterest understand what your content is about.
- Add the main keywords in your profile.
For more keyword ideas, you can look at what successful pinners in your niche are doing.
Check their pin descriptions and board names for keyword ideas.
Pinterest trends shows you what people are searching for right now.
Use this tool to find trending keywords for your pins.
Remember that Pinterest SEO takes time.
Keep using relevant keywords and your pins will start showing up in more searches.
Beyond the Basics: 4 Pinterest Insights Every Beginner Needs
Now that you know how to use Pinterest, let’s tackle the common questions and mistakes that trip up new users. These insights will save you months of trial and error.
Personal vs Business Account: Which Should You Choose?
Go with a business account. It’s free and gives you way more useful features.
Key benefits of business accounts:
- Analytics to see which pins actually work
- Ability to run ads when you’re ready to scale
- Rich pins that pull extra info from your website
- Professional credibility with verified website
Personal accounts work fine if you’re just saving recipes for yourself.
But if you want to grow a following or drive traffic, business is essential. You can convert your existing personal account in two minutes.
Understanding Pinterest Analytics: What Beginners Should Track
Focus on three numbers that actually matter. Ignore everything else for now.
Track these metrics monthly:
- Impressions – how many people saw your pins
- Saves – how many people saved them to their boards
- Clicks – how many visited your website
High impressions with low saves? Your pins aren’t appealing enough.
High saves with low clicks? Your pin looks good but doesn’t deliver on the promise.
Look for patterns in your best-performing pins.
Create more content like that.
Pinterest vs Other Social Media: Why It’s Different for Content Discovery
Pinterest works like Google, not Instagram. Big difference in how people use it.
Why Pinterest is unique:
- People search for solutions, not social updates
- Your pins get discovered months or years later
- Users come with shopping lists and project plans
- Content has a much longer lifespan
One good pin can bring traffic for months.
Focus on solving problems and answering questions.
Think search engine, not social media feed.
Common Pinterest Mistakes That Kill Your Growth (And How to Avoid Them)
These mistakes will tank your Pinterest growth fast. Avoid them.
Don’t do this:
- Pin 50 times a day (you’ll look like spam)
- Use square Instagram photos (Pinterest loves vertical)
- Stuff descriptions with keywords like “amazing awesome incredible”
- Only promote your own content without engaging others
Do this instead:
- Pin 5-10 quality pins daily (or even just 1 pin daily if you stay consistent. Once you get the swing of it, scale it up.)
- Use vertical images (2:3 ratio – 600×900 pixels minimum)
- Write descriptions like a normal person
- Engage with other people’s content regularly
Test your links before pinning. Broken links kill credibility instantly.
Real Quick
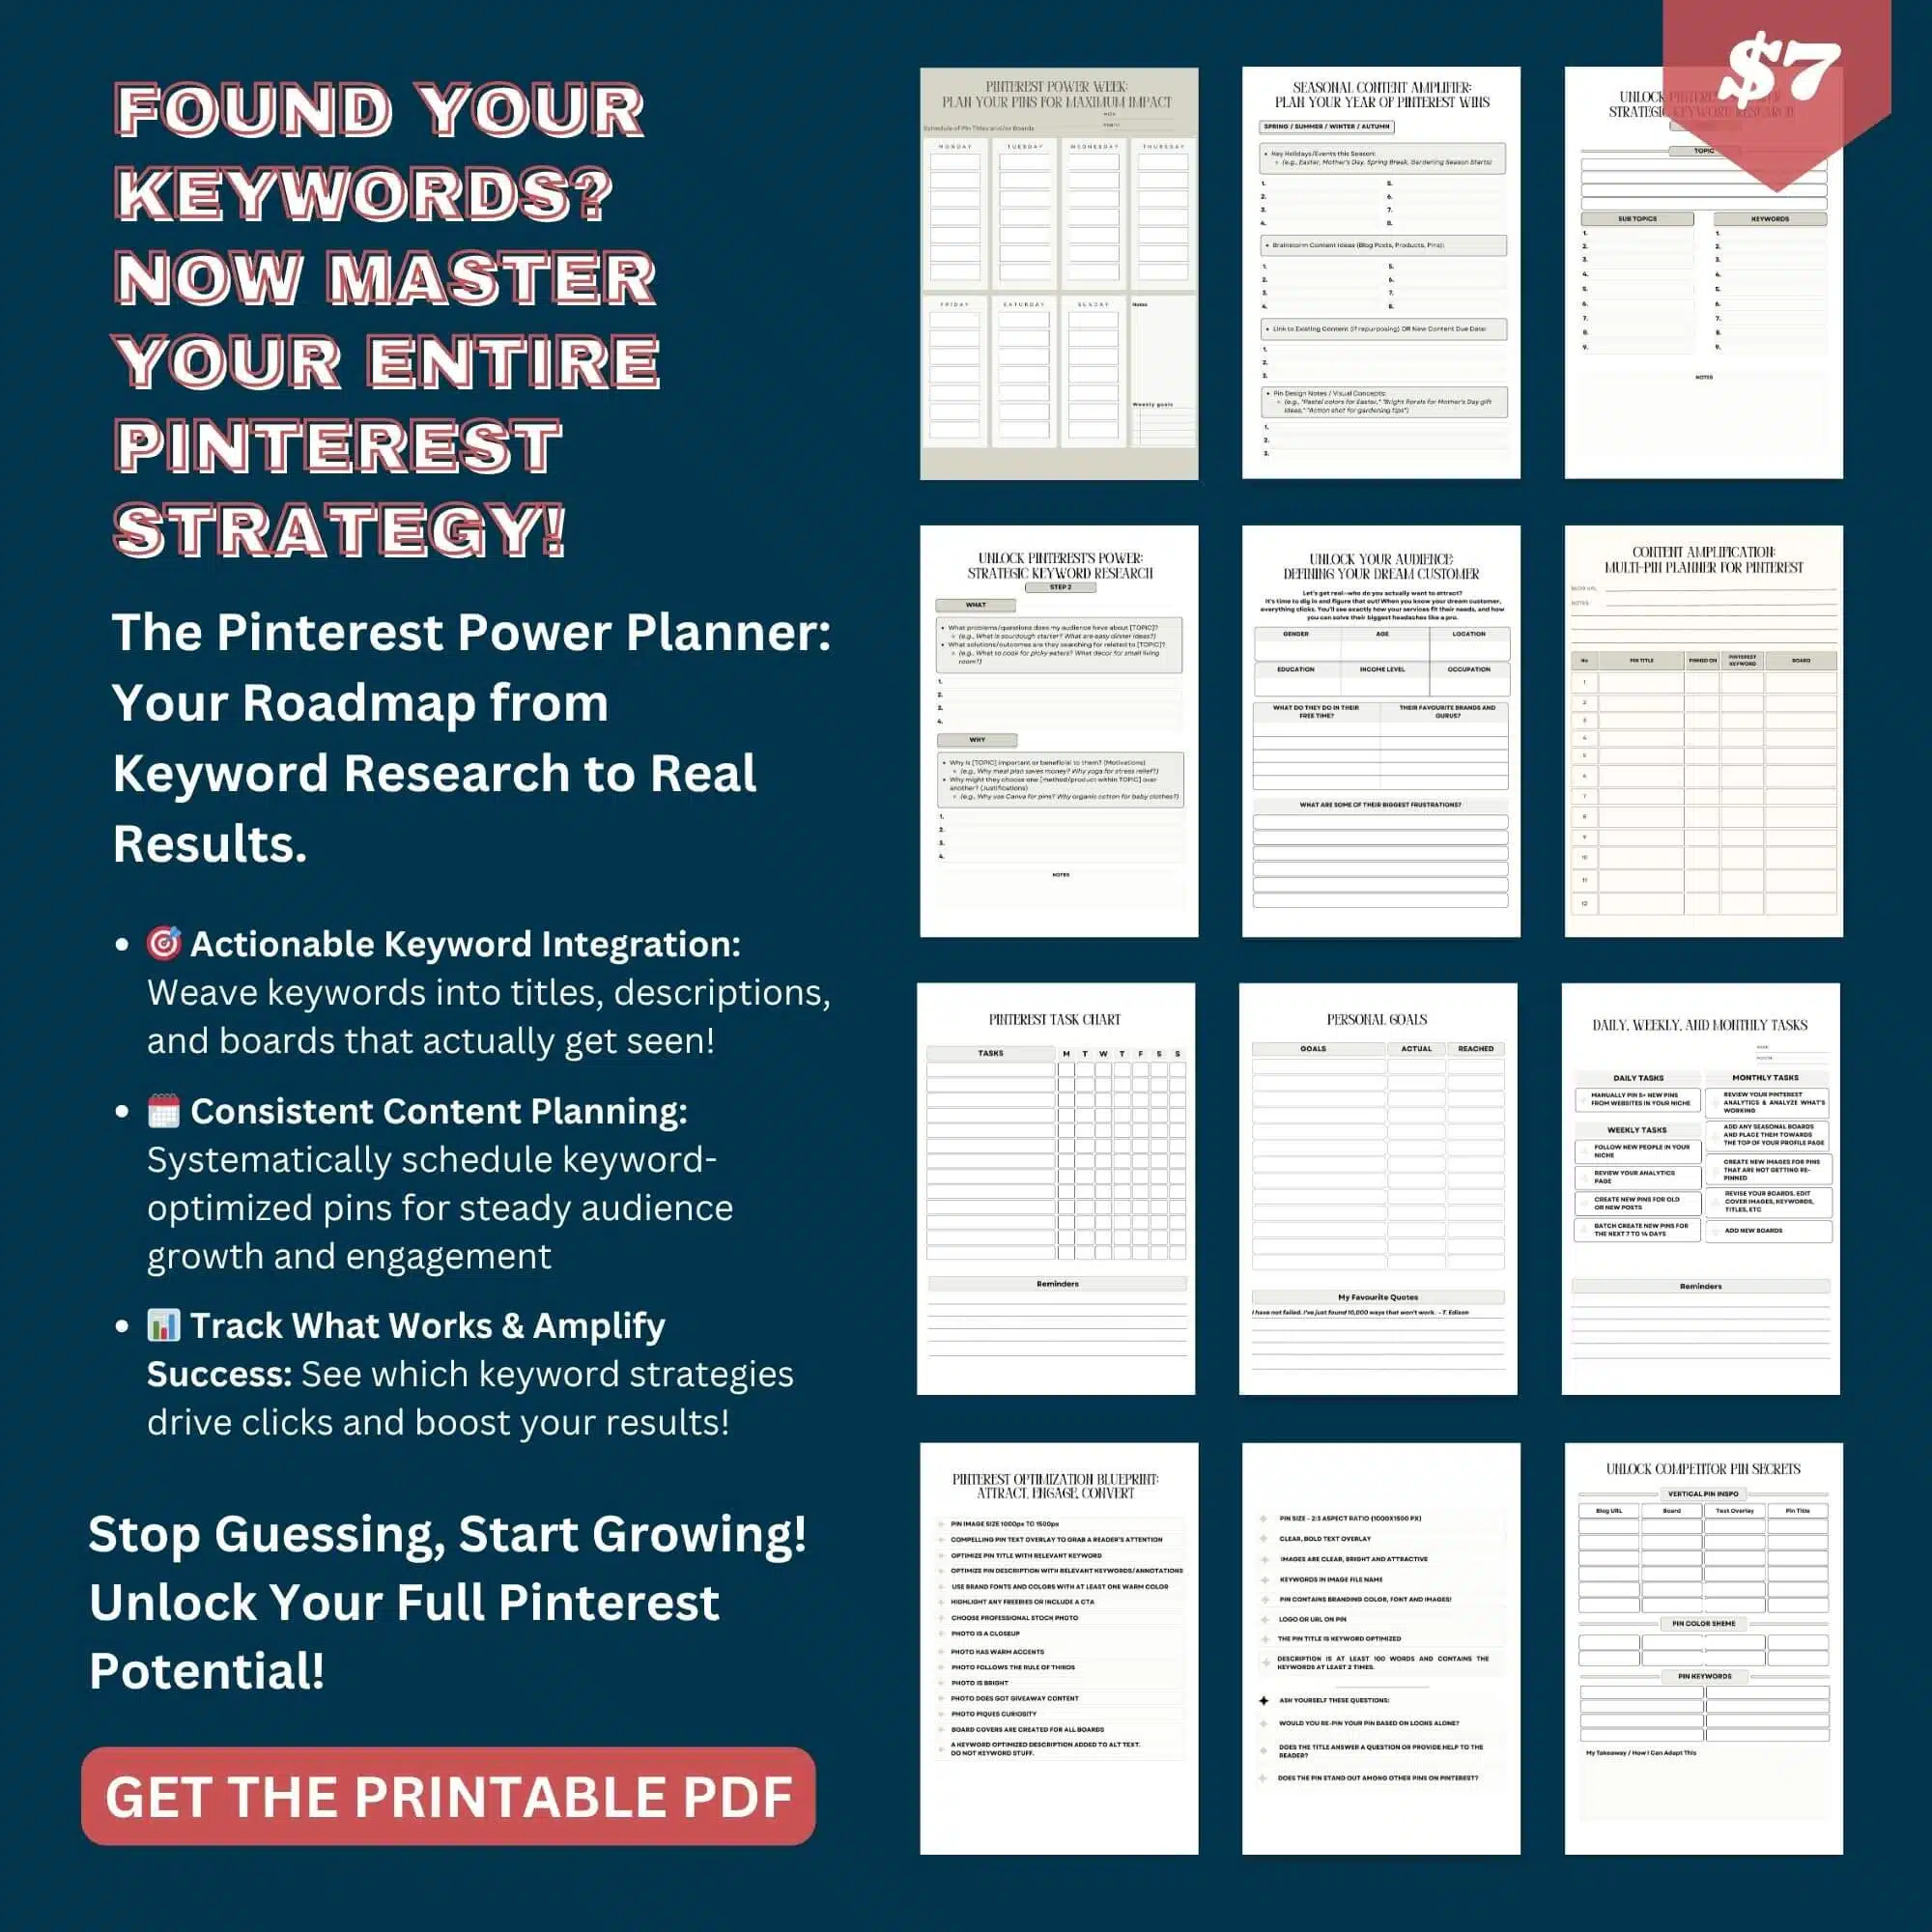
By the way, if you need a planner to stay organized with your weekly pins and keywords, then check out this Printable Power Planner below👇👇👇
How to Use Pinterest for Beginners : The Wrap
Learning how to Pinterest for beginners comes down to understanding the basics and staying consistent.
Set up your business account, create clear boards, and pin regularly to build your following.
The biggest mistake beginners make is ignoring keywords.
Pinterest works like Google – people search for ideas using specific words.
If you don’t use the right keywords, nobody will find your pins.
How to Use Keywords on Pinterest:
- Pin titles – Use 2-3 keywords that describe your content clearly
- Pin descriptions – Write longer descriptions with keywords that sound natural
- Board names – Choose specific names like “Quick Dinner Recipes” instead of just “Food”
- Board descriptions – Add a short explanation using relevant keywords
- Profile bio – Include keywords that describe what you share
Find keywords by typing in Pinterest’s search bar and watching what suggestions appear.
These are real searches people make every day.
Start with 5-10 boards on topics you love. Pin 3-5 times daily, mixing your own content with other people’s pins.
Write descriptions like you’re talking to a friend – keep it simple and helpful.
Pinterest takes time to work, but these basics will get you real traffic if you stick with them.
Focus on helping people find solutions to their problems.
Ready to Learn How to Start a Thriving Pinterest Blog? Click Here Now
Disclosure: This post may contain affiliate links, which means I’ll receive a commission if you purchase through my links, at no extra cost to you. Please read full disclosure for more information.
You Might Want to Check This Out Too
Resources To Grow Your Business With
Pinteresting
Struggling to get traffic from Pinterest? Pinteresting Strategies 2025 by Carly Campbell reveals a manual pinning method that works—even with algorithm changes.
This course walks you through step-by-step strategies to pin effectively, increase engagement, and grow your blog without relying on expensive schedulers.
Carly has used this exact system to bring in 100,000+ page views in just months, and now she’s sharing it with you.
Stop guessing and start seeing real results today!
Bluehost
Bluehost is a great starting point for beginners or bloggers who want to switch to a reliable web hosting service. And it gives you the best bang for your buck - starting at $2.95 a month*.
With the entry-level hosting plan, you'll get a high up-time, reliable customer support, FREE domain name (first year) and 30 day money back guarantee.
You can sign up with Bluehost here.
WPX Hosting
It's a web-hosting service I love using. It specializes in WordPress hosting, and depending on what package you opt for, you can host 5 or more sites on one account. The best bit is - the quick turnaround in support is top notch.
For bloggers who have an established blog, this is a fantastic option.
You can learn more about this service here.
Aweber
Building an email list of a growing audience is essential for the longevity of any business. This autoresponder service is easy to use, and it is a great starting point for someone looking to kickstart their email campaign.
Hi, I’m Jason Ou (surname aka, Oh). I am a Solopreneur and Blogger. My mission is to help fellow entrepreneurs (like you) to profit from their passion online. Let’s connect on Facebook now.
