Want more traffic to your blog or website using Pinterest?
One of the first things you need to do is claim your website.
It sounds techy. But don’t worry. It’s easier than you think!
When I first tried it, I was confused too.
But once I figured it out, I realized it’s a simple step that helps a lot with getting more views from Pinterest.
In this guide, I’ll show you exactly how to claim your WordPress site on Pinterest—even if you’re brand new.
Key Takeaways
- Claiming your website on Pinterest is an essential first step for an effective Pinterest marketing strategy
- The process is easy and shows Pinterest that your website is real and trustworthy.
- After you verify your site, you’ll get extra tools that can help bring more visitors from Pinterest.
Ready to Learn How to Start a Thriving Pinterest Blog? Click Here Now
Save/Pin the image below👇because I often update my posts. So stay informed with this blog “How to Claim a Website on Pinterest” and save it.
This page have some affiliate links. In other words, if you buy from my links, I may get a commission. Some images were sourced from Unsplash+ (Getty Images)
Ready to Learn the 5 Steps to Claiming Your Website on Pinterest? Jump to Step 1 Here and Skip the Rest of the Intro.
What does it mean to claim your website on Pinterest?
When you claim your website on Pinterest, you’re basically telling Pinterest that you own your site.
It’s a simple verification process where I prove I’m the real owner of my website.
Once I claim my site, Pinterest recognizes me as the owner of all pins that link to my domain.
- Pinterest attributes all pins from my website to my account
- Nobody else can claim my website as theirs
- I get recognized as the author of content from my domain
To complete this process, I need access to my website’s admin area.
This security step ensures only the true owner can claim a site.
Pinterest then treats me as the official owner of all pins saved from my website URLs.
Why is it a good idea to claim your website on Pinterest?
Claiming your website on Pinterest isn’t just another task on your to-do list.
It’s a game-changer for your Pinterest marketing strategy!
When you claim your site, Pinterest shows your website link at the top of your profile, so people can easily click and check out what you offer.
One benefit of claiming a website on Pinterest – a clickable website link
👉Also, I’ve found that one of the biggest perks is getting access to Pinterest Analytics.
This powerful tool helps me track how my pins perform and understand my target audience better.
I can see which content resonates with Pinterest users and adjust my strategy accordingly.
👉Another cool benefit is enabling rich pins.
These special pins provide extra information about my content, products, or services directly on the pin itself.
Rich pins make my original content stand out and can include helpful details for potential customers.
If you run a small business, a blog or online shop, claiming your website can help more people notice and trust your content on Pinterest.
This can lead to more clicks, saves, and ultimately more people discovering what you offer!
Benefits of Claiming your website on Pinterest
- ✅ Your website link appears at the top of your Pinterest profile
- 📊 You get access to Pinterest Analytics to see how your pins are doing
- 🧠 Helps you understand what content your audience likes
- 📌 Unlocks Rich Pins that show extra info about your products or posts
- 🌟 Makes your content stand out and look more professional
- 🤝 Builds trust with Pinterest users
- 🔗 Can lead to more clicks, saves, and visits to your website
Real Quick
Ever wish you had a simple roadmap to make your Pinterest efforts more effective and less chaotic?
I created something just for that👇
What You Need First
Before you learn how to claim a website on Pinterest, you will need three (3) things.
1: A WordPress Blog or WebSite
You’ll need a WordPress website or blog for this tutorial.
I’ve designed these steps specifically for WordPress users, so if you’re using another platform, you might need to look for different instructions.
If you don’t have a WordPress website yet but want to start one, don’t worry!
I made an easy guide that shows you how to start your first WordPress blog, even if you’ve never done it before.
WordPress powers about 40% of all websites online, making it a great choice for beginners and experienced bloggers alike!
2: A Yoast SEO Plugin
To make the Pinterest claiming process super easy, you’ll need to install the free Yoast SEO plugin on your WordPress site.
Here’s why it’s helpful:
- Makes adding verification code simple (no coding required)
- Handles the technical parts for you
- Works right from your WordPress dashboard
Without this plugin, you’d need to manually edit your website’s code, which can be tricky if you’re not tech-savvy.
Yoast simplifies everything with just a few clicks.
3: A Pinterest Business Account
You’ll need a Pinterest business account to claim your website.
Don’t worry – it’s completely free to use and offers some awesome benefits:
- Access to Pinterest Analytics
- More detailed insights about your pins
- Better tools for growing traffic to your site
Here are two options to get a business account:
- Create a new business account from scratch, or
- Convert your existing personal Pinterest account to a business one
The business features help you understand what’s working with your pins so you can get more visitors to your WordPress site.
How to Claim Your Website on Pinterest in 5 Easy Steps
Claiming your website on Pinterest is super easy and takes just a few minutes. Maybe in 5, max.
I’ll walk you through the process so you can unlock more features and track how your pins perform.
Step 1: Get to Your Pinterest Settings
First, make sure you’re on your computer for this process – it’s much easier than trying to do it on your phone.
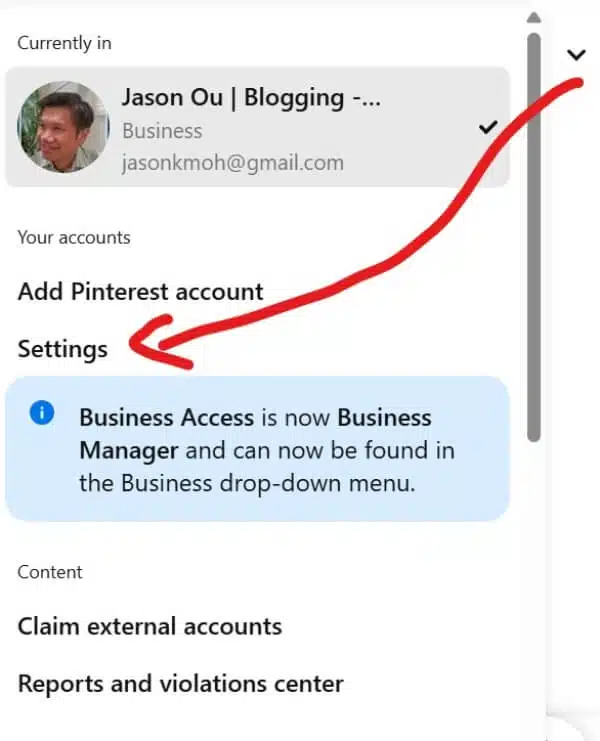
Log in to your Pinterest account and look for the menu icon in the top right corner of your screen.
Click on it and select Settings from the dropdown menu.
This will take you to your account settings page where you can manage all your Pinterest preferences.
Claiming your website on Pinterest – Step 1, settings
Ready to Learn How to Start a Thriving Pinterest Blog? Click Here Now
Step 2: Find the Claim Option
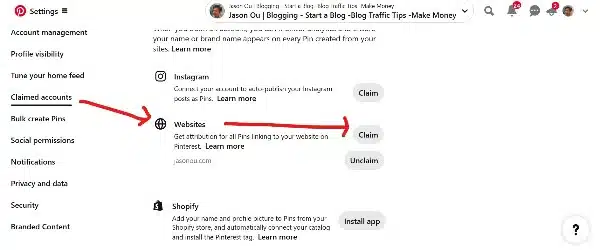
Once you’re in your settings, look at the left sidebar menu. Click on Claim to open up the claiming options.
You’ll see different sections for claiming different types of accounts. Look for the Websites section – that’s where we need to go.
There should be a gray Claim button next to it. Click on that button to start the claiming process.
Step 3: Choose Your Verification Method
Pinterest will show you a popup with three different ways to verify your website:
- Add HTML tag – Adding a meta tag to your website
- Upload HTML file – Uploading a file to your server
- Add TXT record – Adding a DNS record
For most people, the HTML tag method is the easiest, so I recommend selecting that option. Click on the text field to copy the HTML code Pinterest provides, then click Continue.
A new window will appear where you’ll enter your website URL later.
Step 4: Add the Code to Your Website
With the HTML tag copied, open a new browser tab and log in to your WordPress dashboard. For this step, you’ll need the free Yoast SEO plugin installed.
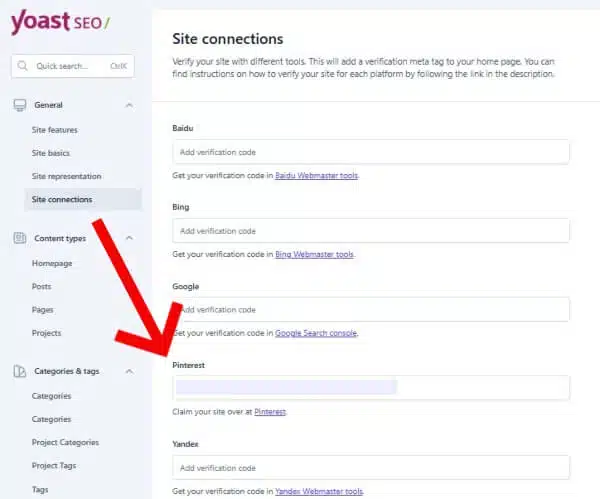
If you don’t have it yet, add it first. Go to Yoast SEO > Settings > General > Site connections in your WordPress dashboard.
Find the Pinterest field and paste the HTML code you copied earlier.
It’s a long string of letters and numbers that helps Pinterest verify that you actually own the website.
How to claiming your website on Pinterest with a Yoast Plugin – Step 4
Step 5: Save and Finish Up
After pasting the code into Yoast SEO, click the Save changes button.
💥Don’t worry if the code looks different after saving – that’s normal!
The plugin reformats it but it still works the same way. Now head back to your Pinterest tab where the verification window should still be open.
Type your full website address in the verification field (like www.yourwebsite.com) and click the Verify button.
Pinterest will check if the HTML tag is properly installed on your site.
If everything works right, you’ll see a success message and also get an email from Pinterest confirming that your website has been claimed.
A recap on how to claim a website on Pinterest
- Go to Pinterest settings and click Claim
- Select “HTML tag” method
- Copy the provided tag
- In WordPress, go to Yoast SEO > Settings > General > Site connections
- Paste the tag in the Pinterest field
- Save changes
Once you claim your site, you’ll have more control over your pins, can make better boards, and your content will look nicer in the Pinterest feed.
This is especially helpful if you post about popular topics like food or run giveaways.
Your username will also appear on pins from your site, building your brand presence.
Ready to put these Pinterest traffic tips into action and see more visitors on your blog?
Here’s a super simple way to organize your plan👇👇👇
Pinterest Marketing Strategy for Bloggers – The Wrap
Claiming your WordPress website on Pinterest is a must-do task if you want to build a solid marketing plan.
When you claim your site, you’re telling Pinterest “Hey, I own this website!” which unlocks some pretty cool benefits.
The easiest ways to claim your WordPress site on Pinterest are:
- Using Yoast SEO plugin – This free plugin makes the process super simple
- Using Insert Headers and Footers plugin – Another easy option that lets you add the necessary code
- Adding a TXT record – Copy the text from Pinterest and add it to your site
Once you’ve claimed your website, you’ll get access to:
- Better analytics about your pins
- More visibility for your content
- Increased credibility with Pinterest users
If you’re just starting with Pinterest, remember it’s not just another social media platform.
Pinterest is a visual search engine.
It works differently and requires a specific approach to get those traffic-boosting results.
Ready to Learn How to Start a Thriving Pinterest Blog? Click Here Now
Disclosure: This post may contain affiliate links, which means I’ll receive a commission if you purchase through my links, at no extra cost to you. Please read full disclosure for more information.
You Might Want to Check This Out Too
Resources To Grow Your Business With
Pinteresting
Struggling to get traffic from Pinterest? Pinteresting Strategies 2025 by Carly Campbell reveals a manual pinning method that works—even with algorithm changes.
This course walks you through step-by-step strategies to pin effectively, increase engagement, and grow your blog without relying on expensive schedulers.
Carly has used this exact system to bring in 100,000+ page views in just months, and now she’s sharing it with you.
Stop guessing and start seeing real results today!
Bluehost
Bluehost is a great starting point for beginners or bloggers who want to switch to a reliable web hosting service. And it gives you the best bang for your buck - starting at $2.95 a month*.
With the entry-level hosting plan, you'll get a high up-time, reliable customer support, FREE domain name (first year) and 30 day money back guarantee.
You can sign up with Bluehost here.
WPX Hosting
It's a web-hosting service I love using. It specializes in WordPress hosting, and depending on what package you opt for, you can host 5 or more sites on one account. The best bit is - the quick turnaround in support is top notch.
For bloggers who have an established blog, this is a fantastic option.
You can learn more about this service here.
Aweber
Building an email list of a growing audience is essential for the longevity of any business. This autoresponder service is easy to use, and it is a great starting point for someone looking to kickstart their email campaign.
Hi, I’m Jason Ou (surname aka, Oh). I am a Solopreneur and Blogger. My mission is to help fellow entrepreneurs (like you) to profit from their passion online. Let’s connect on Facebook now.
